[fancy_header variation=”orange”]Intro[/fancy_header]
Recently i was looking for a AwStats totals solution. The solution had to display all the AwStats sites in one page with statistics per month. Since i couldn’t find such a solution i’ve build one myself. The solution consists of two parts: a command line utility and a webpage/app. The command line utility reads all the AwStats datafiles and generates a single XML. The webapp reads this XML and displays the data. I choose this approach so you can use the XML for other purposes and you don’t have to expose AwStats or .pl files to the web. The downside of this approach is that the data is not “live”, you have to run the command line utility to actualize the data. The command line utililty can be run from a scheduled task.
[fancy_header variation=”orange”]AWstats configuration[/fancy_header]
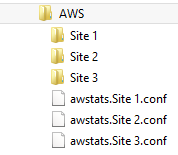
To make this solution work you have to gather all your awstats files to one location in a certain structure. The structure is best explained with a screenshot:
It is recommended to modify the setting SiteDomain and DirData to the same name as the directory, so the same name is used everywhere. It is also important that the datafiles in thee Site folder are named like the example below:
awstats052013.Site 1.txt
awstats062013.Site 1.txt
awstats072013.Site 1.txt
The txt files should contain a section like this:
# Date - Pages - Hits - Bandwidth - Visits
BEGIN_DAY 5
20130626 1335 1335 3501189 2
20130627 2288 2288 6071284 1
20130628 1895 1895 5065862 1
20130629 1807 1807 4853751 1
20130630 1831 1831 4910140 2
END_DAY
When you got your AWStats files in order, it is time to move to the next step.
[fancy_header variation=”orange”]CMD line utility[/fancy_header]
The CMD line utility scans the directory with the AWstats datafiles, and generates a XML file. The utility has 2 settings you need to take a look at, which you can find in ProcessAwstatsConsole.exe.config:
- AwStatsDataPath: The folder where your AWStats datafiles are located.
- XMLFile: The location where the utility should place the generated XML file. Remember to store this file in a location accessible by IIS.
When done, you can run or schedule the Utility to generate an XML file.
[fancy_header variation=”orange”]Webpage[/fancy_header]
The final step is to create a website in IIS and change 1 setting in web.config. This setting (XMLFile) should point to the XML generated by the CMD line utility.
[fancy_header variation=”orange”]Download/Sources[/fancy_header]
I hope you find this tool usefull, you can download the compiled solution using the link below. The tool requires .net 4.0 to function. If you wish to receive the source code you can contact me via the contact form or leave a comment.


Hi there, everything is going sound here and ofcourse every one is sharing information, that’s in fact excellent, keep up writing.
If you are going for finest contents like me, simply
visit this web page every day as it presents quality contents, thanks